Showing posts with label stain. Show all posts

Tuesday, September 25, 2018

Flowers for Fall...

I'm back! The creative side of my brain took a really long vacation this summer. It was too hot to be working in the garage. Aaand...let's face it...I was LAZY! 

I did finish some stained flowers, however. These are mini versions of the other stained flowers I have done. These measure almost 7" including the frame. It was really fun to paint these little guys. I could knock one out in a few hours. That being said, however, it seems to be easier to stain on the larger "canvases."

Orchid

Lotus

Stargazer Lily

I also tried something new. I added a bit of color to the plumeria flower. I painted the frame to tie it all together. I'm pretty happy with how it turned out!

Plumeria

Wednesday, January 17, 2018

Playing Catch-Up...

Wow. Am I glad that December is over! The stress of the holidays, kids out of school, and everyone getting sick (twice in some cases) is behind me.

I get the Winter Blues real bad. It starts around Thanksgiving and I don't escape the "fog" until around February. This year, however, the fog is already lifting! Probably because we have had such a mild winter. Hardly any snow to think of, although we are expecting a snow storm this weekend. The sun has been shining this week and the sky has been blue. I love me some blue sky! 

Since I'm feeling more normal (whatever that is), I actually finished some projects. And I realized there are a few things I've done that I didn't share on the blog. 

This last week I completed some signs for our Young Women's New Beginnings. If you are wondering what the heck that is, I'll tell you. New Beginnings is a time to welcome all of the girls turning 12 this year into the Young Women program. There are three classes of girls. Girls just entering and through to their 14th birthday are called Beehives. Girls ages 14 and 15 are Mia Maids, and girls 16 to 18 are the Laurels. I made each class a sign of their motto. The plan is to hang them up at the church.


I don't have photos of how I made the signs, but I was given some 3/4" plywood already cut to 12" x 16". I then stained the plywood. I found some clip-art, typed up the mottos, and printed them out. I used a projector to enlarge the prints and traced out the words with a white paint pen. I traced the clip-art with a white colored pencil and then painted them.

I used some 1" x 2" pine to make the frames. I sanded them and added some wood stain to the edges. Next, I used some wax in places I wanted the stain to show through and then painted them white. When the paint was dry, or mostly dry, I used a razor blade to scrape of the wax areas. This exposes the dark brown underneath and gives it a roughed-up or aged look. Everything was sealed with a clear coat. I am really pleased with how the signs turned out! Now I have to figure out where in the classroom to hang them...

I also made some simple Christmas gifts. My daughter's teacher is a major Harry Potter fan, so I made him a grouping of four small signs.


I sanded some cedar fence board, cut into 5" squares. I spray painted the squares black and used my projector to trace the words with a white paint pen. I added a bit of color with some acrylic paint. I also roughed-up the edges with my sander and finished with clear coat.

I made some small signs the same way, only using stain instead of paint. I free-handed these with a paint pen.


I also realized I haven't posted some of my other painting, or shading, with stain pictures. I love making these! FYI, I don't know the names of all these flowers, so I gave them names. Artist's prerogative.

Flower Blossom

Daisy Magnified


Hibiscus

Irish Daisy
The Irish Daisy above was fun. I used a knot in the wood to make the center of the daisy. That piece of wood was meant to be a daisy!

Belfast Blossom
I have used Minwax Jacobean for all of my art, but I wanted to try something different. I used Minwax Special Walnut and I had horrible results. The stain spread too quickly, so the flower looked fuzzy. You know, like when you aren't wearing your glasses kind of fuzzy. I was so disappointed because I really wanted to use a different color.

Open Rose
The rose above is a different color because it is a different type of wood. It was a piece of scrap I was given, so I'm not sure what kind of wood. It is also smaller and sold quickly, which means I need to make more of this size!

Tuesday, September 5, 2017

Daisy Do...

This will be a short post. I have so many thoughts running wild through my spaghetti brain that I can't seem to decide on what to write about. That goes along with my low production this summer. Usually I am out working in the garage everyday. The last few months have been too hot and I can't seem to gather the energy necessary to be creative.

That being said, I have found a new type of creation that I thoroughly enjoy making!


Painting with stain on a wood canvas. It is so fun to see an idea come to fruition! Do things always work out how I see them in my mind? Definitely not. But I am just a beginner when it comes to painting with stain. There are a lot of techniques I want to try. 

This daisy and the carnation I posted last time, were drawn freehand. I found pictures I liked and then drew them out on a wood "pallet." 


I used a fine tip brush to outline the flower. In places I wanted darker, I added more stain. This can be time consuming, but it allows me to work on other things in between drying.


To shade the daisy petals, I used a cloth and very lightly dabbed the open lid of the can of stain. I then rubbed the cloth over the petal until it had the look I wanted.


I love it! Wouldn't this piece of art look fabulous on a gallery wall? (Not an art gallery, a home gallery. You know, the type with family pictures and the like?) Actually, it would look good anywhere! Maybe that's why I haven't taken my creations to my booth to sell yet...

Wednesday, August 16, 2017

Carnation for Mom...

On August 15, 2015, I lost my sweet, beautiful Mother to a horrible disease. Pancreatic cancer. No cure. No mercy. It struck fast and hard. She was only 69 years old. She had so much more living to do. Cancer sucks. 

I meant to post this yesterday, but my emotions were too raw and tender. Not to mention my eyes were too puffy to look at the computer screen. The night before last was a doozy of a cry-fest!

On my journey of the last 2 years without my best friend, I have come to terms with my Mother's passing. It wasn't an easy road. For the first year, I cried every day. I then tapered off to crying several times a week, once a week, and then only on important dates or holidays. I can now talk about her without crying. I still can't say, "she died." I have to say, "she passed away." Sometimes I forget she is gone. I think of something funny, an accomplishment, or needed advice. When I remember I can't tell her any of those things, I feel like I've been sucker punched and had my heart squeezed in a vice. Some days are better than others. 

Not a single day goes by that I don't think of my Mother. Whenever I cook, I remember that she taught me how to do it. Whenever I watch a British show, I wish she was watching it with me. Whenever I see the mountains (which is daily), I think of how much she loved the view out of her front window. Whenever I see the color blue, I think of how pretty she looked wearing it. Whenever I watch America's Funniest Home Videos with the family, I wish I could hear her giggle again. Whenever I see a carnation flower, I remember how much she loved their beauty. Whenever I think of our last conversation, I am so thankful it was about how very much we loved each other.

They say time heals all wounds. Maybe, but I think time lessens wounds to still-tender bruises. 

This carnation is for you, Mom.

{Carnation was "painted" with Minwax Jacobean wood stain.}


Friday, May 5, 2017

A Small Tutorial...

Mother's Day is coming! I need my booth to be prepared! What is something fast and easy for me to make several of? 

Small pallet signs! 


Problem: I don't have any pallet wood right now. Solution: 5 1/2" x 6' cedar fence board. This stuff is rough, so plan on sanding it down and creating lots of sawdust. You can absolutely save time if you use other wood, but in this case it was faster to sand than go shopping. 

I cut the boards to 10 3/4" lengths. Why, you ask? Because I wanted the signs to be square, and 2 boards next to each other measures 10 3/4". (There's that sneaky math creeping up on me again!)


I then cut some wood lath 8" long. I glued and screwed 2 on the backs of the cedar board to hold them together.


Two cedar boards and 2 wood lath gave me enough pieces for 6 pallet signs. I had 2 - 5" lengths of the cedar board left over, so I made them into smaller signs. Waste not, want not!

Here's my stack, all ready to go!


All I had to do now was decide how I wanted them to look. I stained all of them in either Minwax Jacobean, Ebony, or Gray, and added some clear coat spray. Then I found some cute quotes about mothers on Pinterest. I got out my new favorite tool, a white chalk marker (yes, I have a new favorite tool for just about every project I do), and free-handed the quotes. I finished with a last spray of clear coat.

Viola! 


And the smaller signs:


Now my booth will be full and ready for Mother's Day!

Monday, April 17, 2017

In Love With a Ladder...

I fell in love with a ladder. A ladder that isn't used as a ladder. This is the ladder in question:

Old Wood Ladder & Chicken Wire Frame:
Source
I followed the pin to credit the original source, but none was found. That makes me sad. Someone should get credit for their beautiful inspiration. Getting credit is something near and dear to my heart, as you may know. If you want to know the whole story, click here.

Anyhoo, I simply had to make one of these ladders! I love the idea! Just one teensy-weensy problem. I don't have an awesome old ladder hanging around. Guess I'll have to build one!

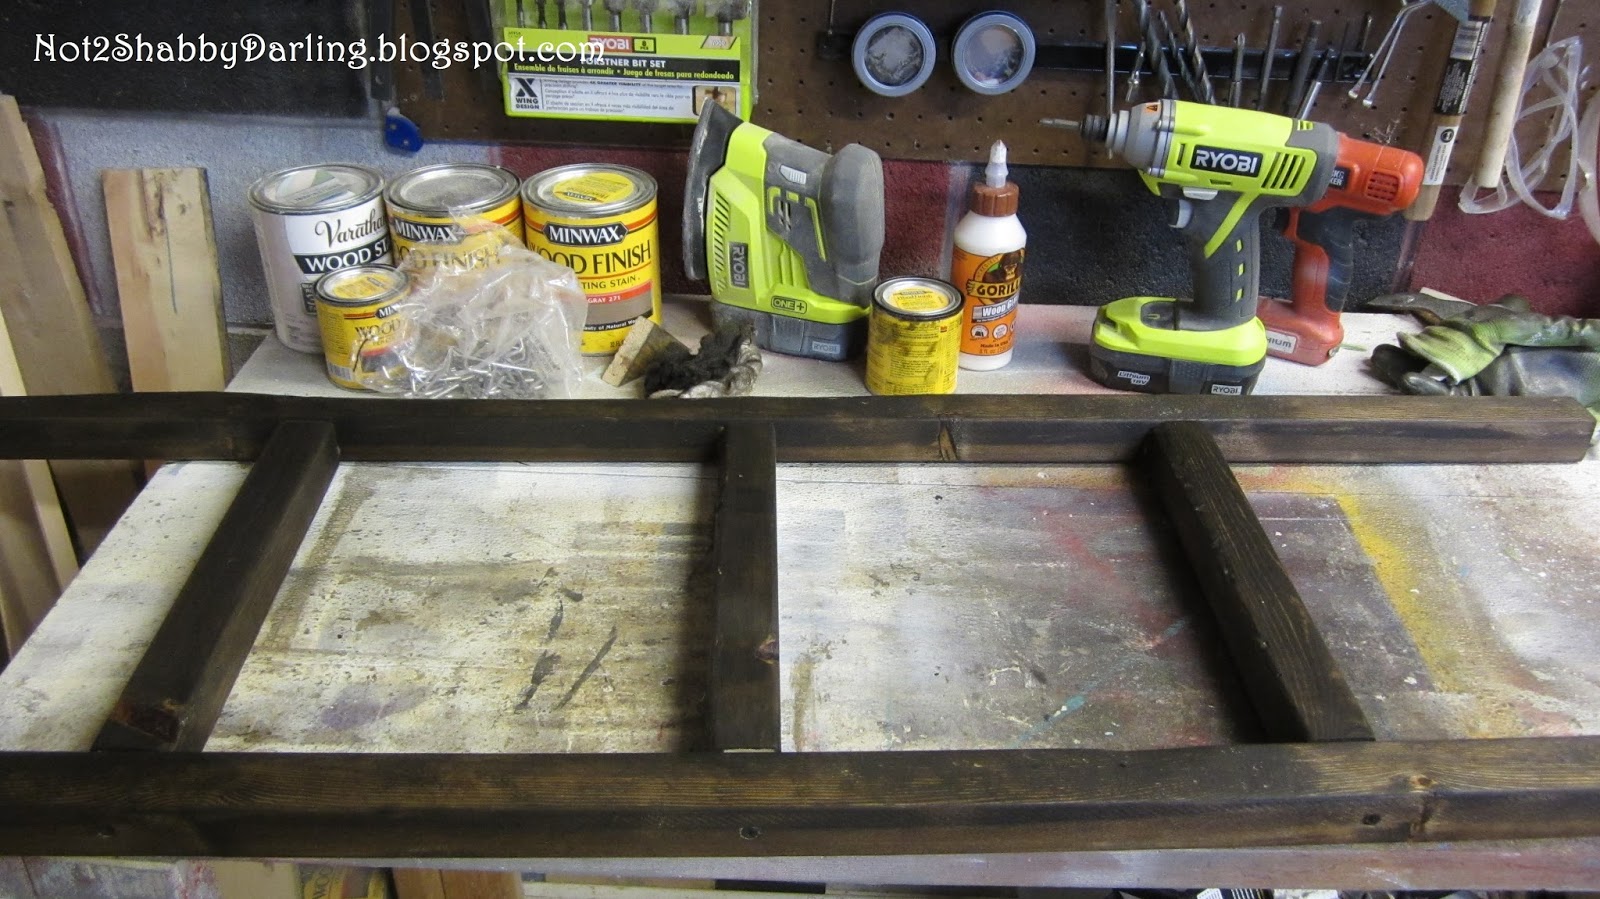
First I decided what size ladder I wanted. I had some 2" x 2" x 8's. To make it easy, I cut one in half. (To prove that I really do use math later in life, that means 2 pieces of wood 24" long.) Then I cut 3 pieces of the 2" x 2" to 12". I wanted to be able to display an 8 x 10 frame between the rungs.


Next I made marks where I wanted the rungs to be, evenly spaced. I forgot to write down the exact measurements, sorry.  I used a counter sink drill bit to drill holes for the 2 1/2" screws. Using a counter sink bit will make sure the screw head doesn't stick out from the wood. We don't want a Frankenstein ladder, do we?


Time to assemble the ladder. I used wood glue to hold everything in place and let it dry. I feel it's easier to screw together if the ladder is already one piece. 


I used my Ryobi driver to attach the screws.


Time for some stain! Once again, I used Minwax Jacobean stain. 


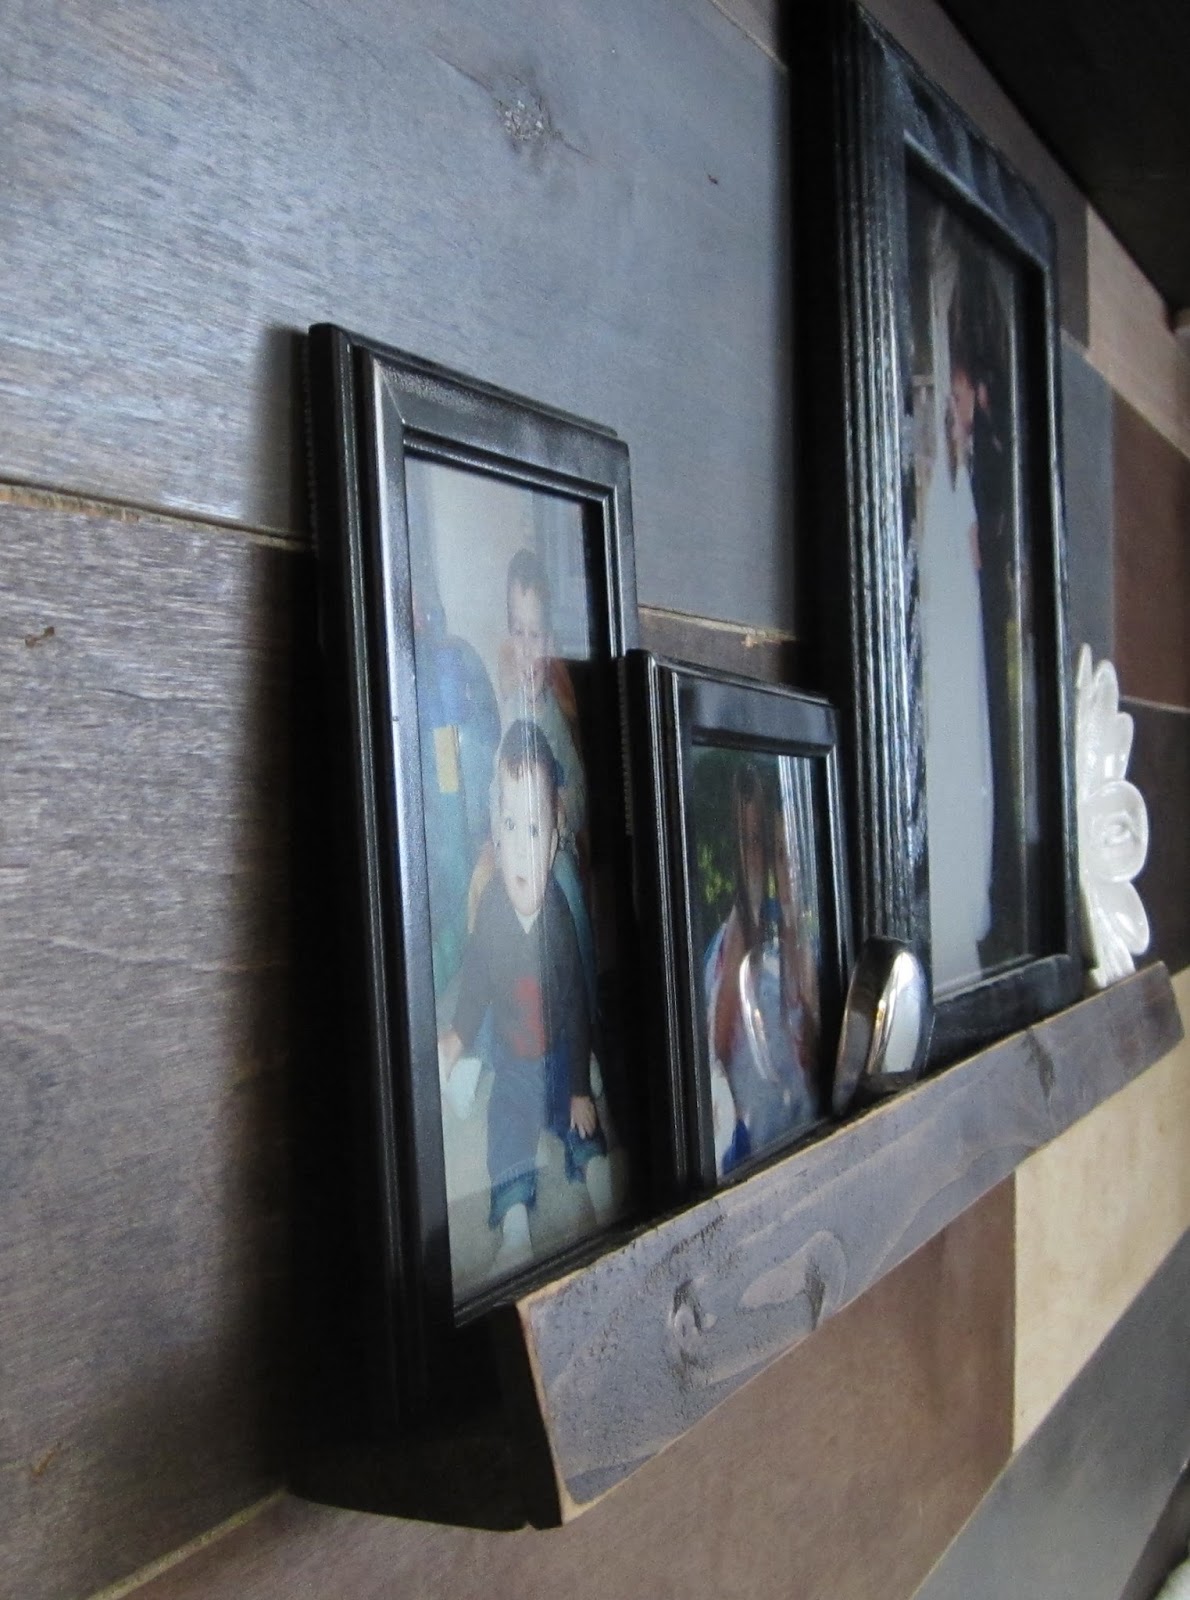
When the stain was all dry, I sanded down the edges to give the ladder an "aged" or "worn" look. I then added some semi-gloss clear coat to "wake-up" the wood. When that was done, I measured out some chicken wire. This stuff is fun to work with, but can be sharp. Wear gloves and use wire cutters to get the amount you want. 


The chicken wire was too shiny for my taste, so I whipped out some black spray paint. I just happened to grab my can of High Heat paint, not because I plan on heating the wire, it was just the first can of black I saw. I wasn't meticulous in making sure the black paint covered everything. I just wanted to tone down the "newness" of the wire. 


For the next part, I grabbed my staple gun. I then added staples to the back of the ladder to hold the chicken wire in place. 


I also added some D-ring hardware (no picture, sorry) to hang the ladder on the wall. I added the hardware so that the ladder can hang horizontal or vertical. Or the ladder can just lean against a wall. 

I thought the ladder was missing something, so I added some fun decorative metal pieces. 


I also stuck some clothes pins on the wire to hang pictures, notes, memos, reminders, etc. 


I am very happy with how it turned out! What do you think?


Monday, April 10, 2017

Quick and Easy...

Today's project is quick and easy to put together. I wanted a "ledge" shelf to hold picture frames for our master bedroom. I wanted something more stylish than some frames hanging on the wall. I also didn't want to put holes in my new pallet wall. Not a simple spackle and paint job for holes in a pallet wall. 

Speaking of my pallet wall, I will post about that later. The wall is done, but I have some building projects to add first. I want to have a big reveal!

Moving on...

Step 1:

Decide how long you want your shelf to be. I just kinda' guesstimated on mine, but it ended up about 22" long. I used scrap wood molding and a piece of wood lathe for this project. Cut the pieces to be the same length. I then sanded the pieces to smooth and clean them. (Using my fabulous Ryobi sander!)


Step 2:

Paint or stain the wood to a color you want. I used Minwax Jacobean stain. This is the longest part of the project, because you have to wait for the stain to dry. What is that saying, "like waiting for paint to dry?" Yup


Step 3:

Using wood glue, put the 2 pieces of wood together lengthwise at a right angle. It should form an "L" shape in profile. Use clamps to tightly hold the wood together. Wood glue takes 30 minutes to dry, so be patient. Or, if you are a mom of 4 kids, get distracted for a couple of days before getting back to this quick project. Either dry time will work!


Step 4:

I used small "L" brackets and attached them to the bottom of my shelf. Then, mark your wall where you want the shelf to go and attach the other side of the bracket to the wall. I used 2 brackets, but if you are doing a longer shelf, you may want to add more brackets.


TIP: If you are centering the shelf, measure more than once! Remember how I said I didn't want holes in my pallet wall? Well, there will be if I fix my shelf placement. Yup. The best laid plans, etc., etc.

Isn't it beautiful? And, you get a peek at my pallet wall!


Wait! Before you go, I have to show you my organized peg board wall! It is a work in progress, but I have been asking Hubby to hang this peg board for a year very long time. All it took was him getting a 3D printer to print peg board hanger clips...


Seriously though, thank you to my sweet, thoughtful, hardworking Hubby!