

I was so sick of looking at the "white" brick. When we bought this house, the fireplace looked great. Fast forward 10 years and 4 little kids, and the hearth was in bad shape. Dirt, ice cream sandwich, crayon and even marker decorated the brick. Have you ever tried to clean brick? It isn't possible. I actually considered using a pressure washer in the house! I saw some gorgeous fireplace renos and really wanted this look:
 |
| SOURCE |
Could I do it? It looked easy enough. Hubby said I should do whatever I wanted, but he was not going to get involved. Oh-kaay...
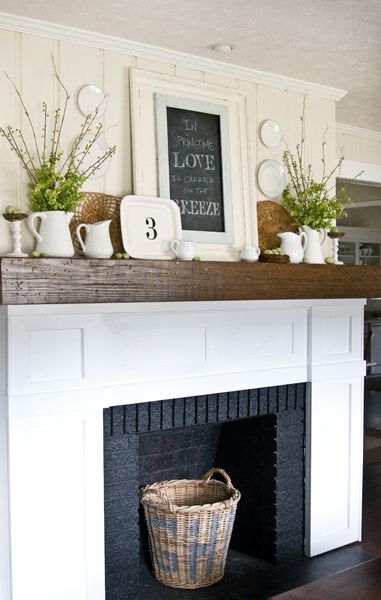
I was undaunted! First, I built out the wall above the mantel. I wanted it to be a feature and really stand out. I used 1/4" plywood and my favorite tool at the time, my nail gun.

Next, I used liquid nails to attach wood to the mantel. This wood was completely free! It came from a huge packing container from Hubby's work. It was perfect because it was IMperfect and the right size! I stained the wood with Minwax Dark Walnut stain. I repeated this several times to get the look I wanted (think old rail road ties).
I was always afraid to paint brick, but it was my only option to get a clean look around the fireplace opening. Someday, I want to use this thing for actual fire, so I didn't want wood too close to the opening. I used some bright white spray paint on the bricks I knew would be exposed. I can't remember the brand I used. I also used Rustoleum High Heat black spray paint for the inside of the hearth. (FYI, I just found out this paint has been discontinued.) I don't have a picture of that step, as I never imagined I would be blogging about it!

I also used 1 x 4 and 1 x 5 trim board to frame out the top. Thin wood strips were added to the brick to give the facade some dimension.

I bought some 1/4" MDF at Home Depot and had them cut it to my measurements. I love Home Depot! They can cut anything for you. They have never charged me a dime, although they post signage reading .50 cents a cut. I used my nail gun and liquid nails to attach these boards.

As you can see, time was going by. This project really shouldn't have taken so long, but I wanted to be 100% in love with the design. When I was ready, I started gluing more trim board on in various lengths. I also decided that the walls next to the fireplace were going to look boring, so I had to add some board and batten! I got to the point in the above picture, and then life got in the way.
My sweet mother was diagnosed with pancreatic cancer on May 22, 2015, my son Chase's birthday. This was devastating news. Everything got put on hold to spend time with my mom. About 2 weeks later, my father-in-law was diagnosed with the same cancer. Yup. I would not be playing for a long while. My mother passed away on August 15, 2015, a short 2 1/2 months after diagnosis. I didn't feel like doing anything. Luckily, my father-in-law's cancer was caught early. He had the Whipple surgery and has spent his time since then in and out of the hospital and the last many months on chemo.
If you would like to learn more about cancer of the pancreas, click HERE
I finally finished my fireplace reno just after Christmas 2015. I LOVE it! I am so proud of myself! The only help Hubby gave me was to hold some trim board in place while I nailed it in!

What do you think?

It looks real nice too!
ReplyDelete