Tuesday, January 24, 2017

A Reclaimed Life...

What exactly is "reclaimed wood?" Well, in my humble opinion, it is any wood you rescue from scrap, junk, being destroyed, or dying a slow death in a grassy field. Wood that is just waiting for you to come along and see that it still has some worth. No one wants to be cast aside when they no longer look nice, or have served their original purpose, right? Some of the most beautiful wood I have played with just needed a little TLC. 

My very handsome older brother and his extremely talented wife are in the process of remodeling their home. They have a large backyard and a wood pile they want to have disappear. (They also will have lots of scrap trim for me soon. Woo-hoo!) Before they hauled it away, they offered to let me have whatever I wanted. Happy dance! 

Most of the wood was in very good, time-worn condition. It only needed a quick sanding and cleaning with a metal brush. Underneath the grime and age was gorgeous wood! This stuff was fantastic to work with! I made so many different creations, including 2 custom orders!

Here are some of the creations:

I call this one "Crown Shelf." (painted)
"Crown Shelf" natural.
"Hi-Low Box"
"Drawer Box"
Large Mirror
A simple shelf.
Entryway Mirror (with a mini chalkboard).
"Skinny" shelf.
Shelf with dowel.
Large shelf.
Whitewashed shelf.
Entryway organization center with leather accents.

This was a custom shelf ordered by the same lady
who bought the shelf  above.
Another custom order.
I am not one to brag, but aren't they gorgeous! I love giving old/neglected wood a new life!

P.S. If you happen to have any sad and lonely wood that needs a new home, please, give me a call!

Sunday, January 15, 2017

Fireplace Reno...

I was not happy with my fireplace. It is the focal point in the living room, and it was making me depressed. Here is the before:


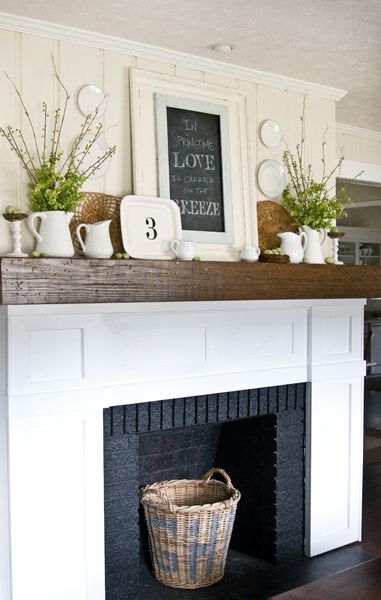
I was so sick of looking at the "white" brick. When we bought this house, the fireplace looked great. Fast forward 10 years and 4 little kids, and the hearth was in bad shape. Dirt, ice cream sandwich, crayon and even marker decorated the brick. Have you ever tried to clean brick? It isn't possible. I actually considered using a pressure washer in the house! I saw some gorgeous fireplace renos and really wanted this look:

SOURCE

Could I do it? It looked easy enough. Hubby said I should do whatever I wanted, but he was not going to get involved. Oh-kaay...

I was undaunted! First, I built out the wall above the mantel. I wanted it to be a feature and really stand out. I used 1/4" plywood and my favorite tool at the time, my nail gun.


Next, I used liquid nails to attach wood to the mantel. This wood was completely free! It came from a huge packing container from Hubby's work. It was perfect because it was IMperfect and the right size! I stained the wood with Minwax Dark Walnut stain. I repeated this several times to get the look I wanted (think old rail road ties).

I was always afraid to paint brick, but it was my only option to get a clean look around the fireplace opening. Someday, I want to use this thing for actual fire, so I didn't want wood too close to the opening. I used some bright white spray paint on the bricks I knew would be exposed. I can't remember the brand I used. I also used Rustoleum High Heat black spray paint for the inside of the hearth. (FYI, I just found out this paint has been discontinued.) I don't have a picture of that step, as I never imagined I would be blogging about it!


I also used 1 x 4 and 1 x 5 trim board to frame out the top. Thin wood strips were added to the brick to give the facade some dimension.


I bought some 1/4" MDF at Home Depot and had them cut it to my measurements. I love Home Depot! They can cut anything for you. They have never charged me a dime, although they post signage reading .50 cents a cut. I used my nail gun and liquid nails to attach these boards.


As you can see, time was going by. This project really shouldn't have taken so long, but I wanted to be 100% in love with the design. When I was ready, I started gluing more trim board on in various lengths. I also decided that the walls next to the fireplace were going to look boring, so I had to add some board and batten! I got to the point in the above picture, and then life got in the way. 

My sweet mother was diagnosed with pancreatic cancer on May 22, 2015, my son Chase's birthday. This was devastating news. Everything got put on hold to spend time with my mom. About 2 weeks later, my father-in-law was diagnosed with the same cancer. Yup. I would not be playing for a long while. My mother passed away on August 15, 2015, a short 2 1/2 months after diagnosis. I didn't feel like doing anything. Luckily, my father-in-law's cancer was caught early. He had the Whipple surgery and has spent his time since then in and out of the hospital and the last many months on chemo. 

If you would like to learn more about cancer of the pancreas, click HERE

I finally finished my fireplace reno just after Christmas 2015. I LOVE it! I am so proud of myself! The only help Hubby gave me was to hold some trim board in place while I nailed it in!


What do you think? 

Wednesday, January 11, 2017

How It All Began...

I mentioned in my first post that I would tell you how I got started creating with wood. Well, here goes...

My husband (Hubby) used to work for a manufacturing company. He was the go-to tool repair guy. He soaked up all kinds of knowledge on how to fix all kinds of things, which I have benefited from greatly. (Think washer, dryer, dishwasher, toys!) 

Anyhoo, Hubby now works at the local technical college as an Automation Technology Instructor. He was born to be a teacher! He is also a people person, making friends easily. So, one day a co-worker mentioned she needed to buy a new scroll saw. Hers had quit working after years of making wood cut-outs for her yard and decorations. This wonderful lady said Hubby could have the old saw and see if he could fix it. Of course, he did! He thought I would enjoy using the scroll saw to make my own things out of wood. He saw potential in me when I couldn't. He has always believed in me and I am so very lucky to have him in my life. (Shout out to Hubby!) 

Now, about the same time, my wonderful In-Laws had to replace their old wood fencing. I had been thinking about making a fireplace screen out of wood. I just never got the gumption to go buy what I needed. It was fate. Fate I tell you! I asked for some of the old wood to play with. Thankfully, my In-Laws only gave me strange looks and indulged me.

Fireplace Screen (a.k.a. My First Project)

I love how it turned out! I had so much fun and felt so impressed with myself. I love turning my ideas into reality. I didn't know what I was capable of until I tried. So, I tried some more...

Apple Basket Hanging

Seasonal Door Hanging

...and more...

Memo Board/Organization Center

Porch Snowflakes

...and even more!

Monogram Porch Sign

Paisley Painting


Now I have a booth of my very own, featuring my creations, at the Quilted Bear in Ogden! Stop by and check it out if you are in the neighborhood! (Booth R-10)


Monday, January 9, 2017

May the Horse Be With You...


This is my most popular pin on Pinterest. Now that my blog is up and running, I thought I'd better try and get some credit for it!

I have a 10 year old daughter who is absolutely in love with horses. She has been a cowgirl at heart since she was tiny! When she was 2 or 3, she had some cowgirl boots that she was obsessed with. I remember her walking up and down the sidewalk in a shirt, diaper and those boots! At age 4, she watched Toy Story 2 (when we meet Bullseye) at least twice a day. My girl has stuffed horses covering her bed. She wears t-shirts with horses and jewelry depicting horses. You get the idea, right?

Well, this creation came about for my girl's 10th birthday. I was at Cracker Barrel one day and they had a sign to buy that said, "May the Horse Be With You." I had some great pallet wood that I was trying to think of a purpose for. I had a light bulb moment!

I cut a horse and horseshoe silhouette out of MDF, painted everything up, and presto! I was so excited to give this gift! My girl loved it! Other people loved it, too. I had several orders for signs in different colors, and I sold several from my Quilted Bear booth.


My girl has a birthday coming up again soon. 
Wonder what I can make her...

Wednesday, January 4, 2017

I Finally Did It...

Welcome to my new blog!

I know, I know. It's 2017 and I'm just now starting a blog! Why, you ask, did I wait so long? A few reasons. 1. I was scared. Who is going to want to read what little ol' me has to say? 2. I thought I'd be fine without a blog of my very own. 3. What if I didn't have enough "content" to justify a blog?

Well, I am still scared, a certain event proved I did need my own blog, and we'll just have to see if I can come up with enough content.

Anyhoo, back to that certain event I mentioned. Some of you know I have been making "creations" with wood stuff for a few years now. (How and Why will be a later post.) I have been "pinning" photos of my creations on Pinterest and Facebook. When I pin to Pinterest, there is no way to link to a source, so my photos are out there with no way to be attributed to me. This wasn't a really big deal to me, I just thought it was cool if people liked and repinned things I had done.

That is, until, I was scrolling through Pinterest the other day and saw one of my pictures on a design website's post entitled,

THE MOST BEAUTIFUL 101 DIY PALLET PROJECTS TO TAKE ON.


(My creation is #80.)

I was stunned, elated, excited and flattered! Something I made was recognized! BUT, who would ever know it was MINE? Now, I'm not saying that the website did a bad thing. They did try to site the source. If you click on the source link, it takes you right to the picture. If they could have given me credit, they would have. Lesson learned. Point taken. Live and learn. Hindsight. My bad.

Well world, I am giving you a source from now on! I am taking credit for my mistakes hard work! Here it is:


I call it, "The Beginning."