Showing posts with label reclaimed. Show all posts

Monday, May 22, 2017

Tick Tock...

I was asked to make a clock project for our Relief Society's Super Saturday. For those of you who don't know, Super Saturday is a time to get together with the other ladies in the neighborhood and craft, visit, eat, and craft some more. These gatherings are a lot of fun and gives us a chance to learn from one another and get to know each other better. There were several crafts going on, such as glass etching, crocheting, paper qwilling, and wood craft. Mine, of course, was the wood craft. 

I was asked to do some wood clocks like this one I did several years ago:


I no longer have the clock. I gave it to a friend, who was once my neighbor. Whose mother is still my neighbor. Who is also my friend, who happens to be in the Relief Society presidency. Which, I'm guessing, is one reason I was asked to do this project. 😉

I made this clock with reclaimed fence wood and a vinyl wall clock from Die Cuts With A View. I got the clock about 4 years ago from a local Real Deals store, which has since closed. The clock cost me a whopping $3! A total steal, seeing as the original price was $39.99! 

I was slightly worried about getting clock parts for this project. I didn't know if I could find the same clock parts. I looked at various ways of doing it, but really, the easiest is vinyl. I was browsing a new website I found, Hollar.com, and guess what they had? 

Source
Yep. Jackpot! These babies were $5 each when I bought them. (Now, of course, they are $4 each.)

I ended up making 12 of the clock bases for our Super Saturday. Now, I don't like to procrastinate things, but I am ashamed to admit I did not make these clocks until the day before the big shin-dig. My excuses are many. I had to make Mother's Day gifts for my booth. My son had surgery and required my attention. I had a dentist appointment. I had to sleep. You get the idea. It was like rushing through an essay the night before it's due, only way more enjoyable.

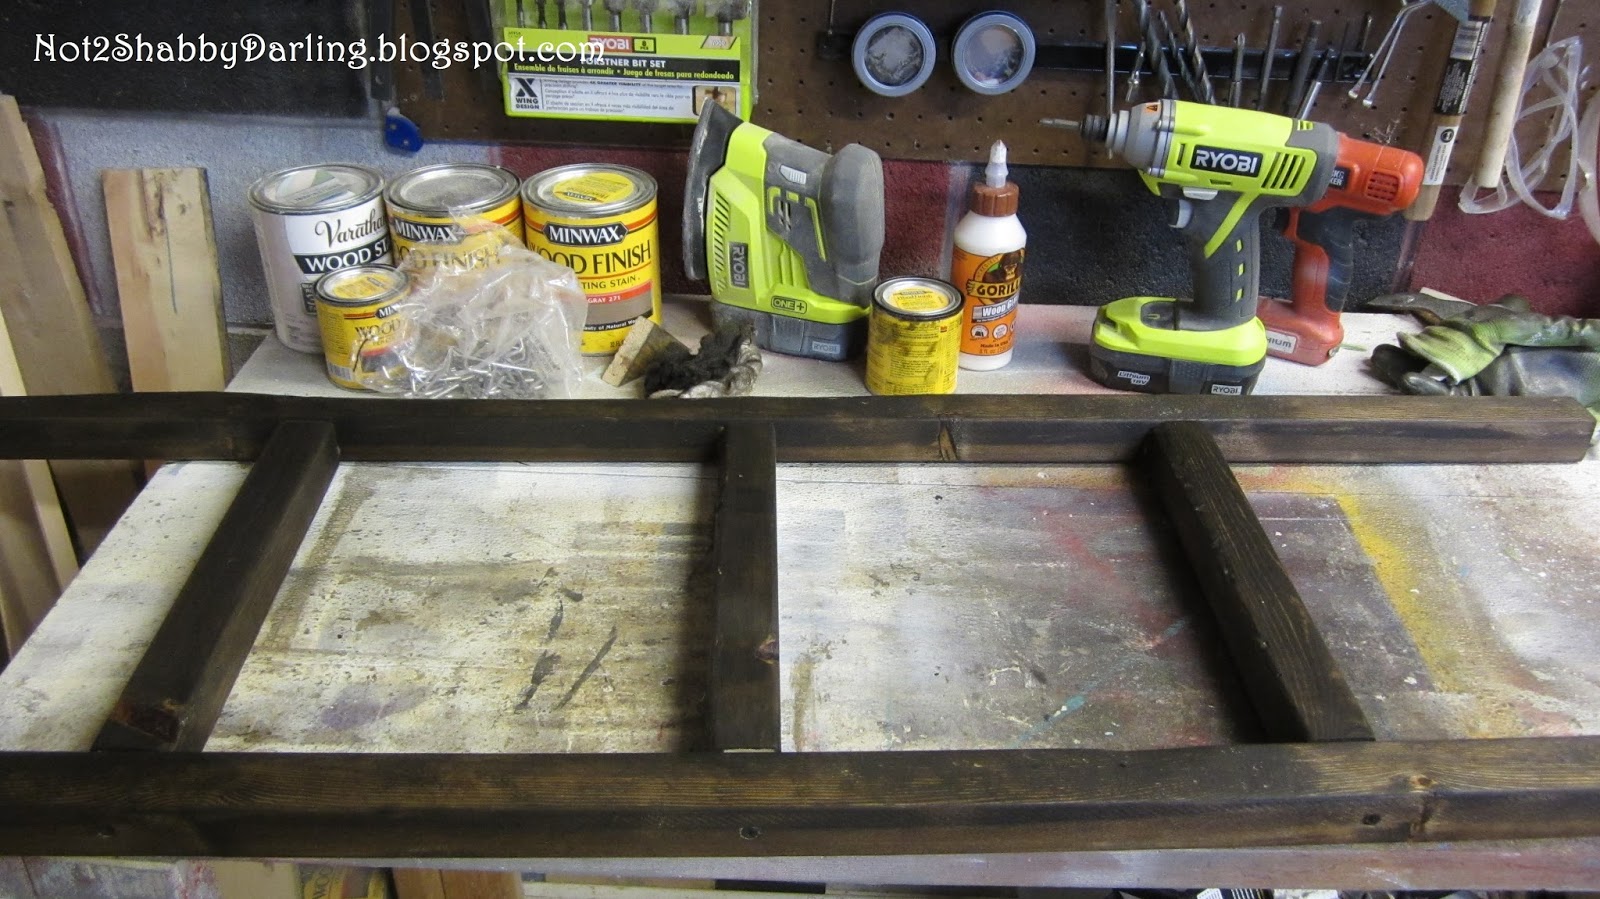
I used 1"x4"x8' furring strips for the wood. I cut the boards into 20 1/4" lengths and gave them a quick sanding. Each clock takes 6 boards.


I laid them next to each other and attached them together with wood lath, glue and screws.


Now, simply repeat 12 times.

All of the ladies had a fun time painting the clocks. I am really kicking myself for not getting pictures of each of them, but I requested pics of the finished clocks hanging in their houses. If I get permission, I will post them here.

Each clock only cost $11. Not a bad investment, if I do say so myself!

Wednesday, May 3, 2017

More Cabinet Doors...

I had a very productive Monday. The weather was nice, I had nothing on my calendar, and most of all, I had ideas!

I had several old cabinet doors just waiting to be given a new life. I got them from the same shopping trip I mentioned here. No tutorial this time. In fact, I forgot to get before pictures. (Sigh.) My only excuse is that I was too excited to get to work!

Here is one idea two ways:


They can be used for photos or message displays. 

This one has new life as a coat rack and cork/chalkboard. Wouldn't it be fun in the entryway or mudroom?


The last one decided it wanted to be an artistic picture "frame." Not a frame in the typical sense. It has clothespins to hang pictures from a strip of braided leather. The leather was left over from another project I did that used an old belt. I found it while rummaging through my collection of "stuff." It was the perfect length, so it was kismet, fate, meant to be!


Now, if you will excuse me, the garage is calling...

Monday, April 24, 2017

It's All About Family...

Look what I made out of a reclaimed wood cabinet door!


Can you believe it? It looks like I used a frame. This was soooo easy! I'll show you some steps, but I forgot to get pics of the entire project. (Smacks hand to forehead)

I have found a new love. It's the ReStore in Ogden. They have so many fun things to buy. You never know what you will find and your mind works overtime thinking of what to create. It's like a thrift shop for DIYers! All proceeds go to Habitat for Humanity. Check out the link to learn more. 

I found several reclaimed cabinet doors. The prices run between $2 and $7, but I have gotten several for $1. A dollar guys!

Anyhoo, I taped off the door to paint the "frame" white. I wanted this project to have a "chippy paint" look, so before I painted, I rubbed a little wax along the edges of the frame. When the paint is dry, you can wipe or scrape off the wax and get an awesome time-worn look. 


I cut down some scrap wood I had and painted it in several different colors. Then I sanded them a little to make them look worn.


After everything was dry, I used wood glue to attach the scraps of wood to the center of the door. I weighed down the scraps with whatever heavy thing I had nearby. 

I had the word "family" left over from one of my sister's projects. I painted it white to match the frame and then sanded it to rough it up. I think it helps to stand out from the background. I used wood glue for this as well.

I love it! So fun and it makes me happy!


Monday, April 17, 2017

In Love With a Ladder...

I fell in love with a ladder. A ladder that isn't used as a ladder. This is the ladder in question:

Old Wood Ladder & Chicken Wire Frame:
Source
I followed the pin to credit the original source, but none was found. That makes me sad. Someone should get credit for their beautiful inspiration. Getting credit is something near and dear to my heart, as you may know. If you want to know the whole story, click here.

Anyhoo, I simply had to make one of these ladders! I love the idea! Just one teensy-weensy problem. I don't have an awesome old ladder hanging around. Guess I'll have to build one!

First I decided what size ladder I wanted. I had some 2" x 2" x 8's. To make it easy, I cut one in half. (To prove that I really do use math later in life, that means 2 pieces of wood 24" long.) Then I cut 3 pieces of the 2" x 2" to 12". I wanted to be able to display an 8 x 10 frame between the rungs.


Next I made marks where I wanted the rungs to be, evenly spaced. I forgot to write down the exact measurements, sorry.  I used a counter sink drill bit to drill holes for the 2 1/2" screws. Using a counter sink bit will make sure the screw head doesn't stick out from the wood. We don't want a Frankenstein ladder, do we?


Time to assemble the ladder. I used wood glue to hold everything in place and let it dry. I feel it's easier to screw together if the ladder is already one piece. 


I used my Ryobi driver to attach the screws.


Time for some stain! Once again, I used Minwax Jacobean stain. 


When the stain was all dry, I sanded down the edges to give the ladder an "aged" or "worn" look. I then added some semi-gloss clear coat to "wake-up" the wood. When that was done, I measured out some chicken wire. This stuff is fun to work with, but can be sharp. Wear gloves and use wire cutters to get the amount you want. 


The chicken wire was too shiny for my taste, so I whipped out some black spray paint. I just happened to grab my can of High Heat paint, not because I plan on heating the wire, it was just the first can of black I saw. I wasn't meticulous in making sure the black paint covered everything. I just wanted to tone down the "newness" of the wire. 


For the next part, I grabbed my staple gun. I then added staples to the back of the ladder to hold the chicken wire in place. 


I also added some D-ring hardware (no picture, sorry) to hang the ladder on the wall. I added the hardware so that the ladder can hang horizontal or vertical. Or the ladder can just lean against a wall. 

I thought the ladder was missing something, so I added some fun decorative metal pieces. 


I also stuck some clothes pins on the wire to hang pictures, notes, memos, reminders, etc. 


I am very happy with how it turned out! What do you think?


Saturday, February 4, 2017

Shading...

I don't have a tutorial for this creation...yet. This was my first attempt at shading with wood stain, and I really didn't know how it would turn out. Or how I would finish it. Or if I would do it again.

I've been drooling over some gorgeous flower table tops done with stain. They are so beautiful! I don't pretend to be an artist, but I'm willing to try something at least once. I knew I needed to test my ability on something smaller than a table, however.

My super sweet aunt asked me to come up with something for her dinning room. She told me it needed to be the size of an open calendar and have the colors of rust and tan. Okay...That leaves the field of ideas WIDE open! 

Enter: wood stain flower art! I cut some wood scraps to about 17" long. I laid 3 side by side, which came out to close to 11". That's about the size of a calendar, right? I lightly painted the wood with rust colored paint. I knew I wanted some of the natural wood to show. 

Next, I stared looked at a picture of a dahlia. It looked simple, but I didn't want to mess it up! I free-handed the petals and got out my stain. I used a very small sponge brush to apply the stain. Next time, I will use a detail bristle brush for better control to paint the stain. That, and a different type of wood.

This process is time consuming, but hey, I happen to love the smell of wood stain. Like, if it tasted as good as it smells, I would probably try to drink it. I know. I'm strange, weird, crazy, etc. Yes, I know it's not good for you to inhale. No, I don't "huff" the stuff. I just really enjoy using stain. 

(Side-note: if someone really smart could pretty please develop air freshener or perfume that is non-toxic and smells like wood stain, I would be so very grateful!)

Anyhoo, once the stain was good and dry, I painted the petal outlines with a sand color paint. I also added more rust color to the base of the petals to give them depth. 


I cut some 1 x 2"s to frame up the finished art and stained them. After the framing was done, it still didn't look right, so I lightly sanded the edges for that ever popular "worn" look. 

It still didn't look done, so I looked through my treasure box and found some corner protectors. That's what was missing. Perfect! 


Sooo... it looks more like a chrysanthemum than a dahlia, but that's okay. It looks like a flower, which was the point. FYI, I know it looks like a flower because I asked my kiddos what it was and they responded, "a flower." Score!


I kinda' like it. More importantly, my aunt liked it! I will definitely be making more of these types of wood art. The possibilities are endless!  

Wednesday, February 1, 2017

A Quandry...

So, I have a bit of a problem. I have been making certain wood creations for a while now, and I think I have been calling them the wrong name. Not unlike when you want the attention of one child and end up saying the names of all their siblings first. "Hey, Brayden, Chase, Faith, I mean Lilly!"

Side story: my father-in-law had 3 boys and struggled with calling them by their names. Just to cover his bases, he would call out, "Ryan, Scott, Kelly, Mary, Ellen, Jane!"

Well, I have been using the wrong name to describe a type of art. The object looks like this:


This is what I have been calling "3D" art. Many times. For several years. Written down. On price tags.

"3D" Tree

It recently occurred to me that it might not be correct!

I really want to name my babies wood creations the right name. If you spend a lot of time creating something, it deserves the right name. I didn't spend 9 (8, really) months creating my first born child only to look at him and say, "I shall call him Dexter." Nope. He was definitely a "Brayden!"

So, I Googled it, and ya' know what? It's hard to google the word for something when you don't know what word to google! What is the correct name? I don't know. I searched and asked Hubby what he thought. Here are some of their ideas:

A relief is a sculptural technique where the sculpted elements remain attached to a solid background of the same material. (source)

"Relief" Home Sweet Home?


shadow is a dark area where light from a light source is blocked by an opaque object. (source)

"Shadow" Home Sweet Home?

Intaglio, in sculpture, engraving or incised figure in stone or other hard material such that all lines appear below the surface; it is thus the opposite of relief sculpture and is sometimes called “hollow relief.” (source)

"Intaglio" Love at Home?
None of these sound like the right fit. How 'bout the definition for "3D" art?
Three-dimensional definition, having, or seeming to have, the dimension of depth as well as width and height. (source) 

Huh. Maybe "3D" does work. What do you think?

"3D" Love at Home

Tuesday, January 24, 2017

A Reclaimed Life...

What exactly is "reclaimed wood?" Well, in my humble opinion, it is any wood you rescue from scrap, junk, being destroyed, or dying a slow death in a grassy field. Wood that is just waiting for you to come along and see that it still has some worth. No one wants to be cast aside when they no longer look nice, or have served their original purpose, right? Some of the most beautiful wood I have played with just needed a little TLC. 

My very handsome older brother and his extremely talented wife are in the process of remodeling their home. They have a large backyard and a wood pile they want to have disappear. (They also will have lots of scrap trim for me soon. Woo-hoo!) Before they hauled it away, they offered to let me have whatever I wanted. Happy dance! 

Most of the wood was in very good, time-worn condition. It only needed a quick sanding and cleaning with a metal brush. Underneath the grime and age was gorgeous wood! This stuff was fantastic to work with! I made so many different creations, including 2 custom orders!

Here are some of the creations:

I call this one "Crown Shelf." (painted)
"Crown Shelf" natural.
"Hi-Low Box"
"Drawer Box"
Large Mirror
A simple shelf.
Entryway Mirror (with a mini chalkboard).
"Skinny" shelf.
Shelf with dowel.
Large shelf.
Whitewashed shelf.
Entryway organization center with leather accents.

This was a custom shelf ordered by the same lady
who bought the shelf  above.
Another custom order.
I am not one to brag, but aren't they gorgeous! I love giving old/neglected wood a new life!

P.S. If you happen to have any sad and lonely wood that needs a new home, please, give me a call!