Showing posts with label sign. Show all posts

Saturday, November 18, 2017

Countdown to Christmas...

I had a friend ask me to make her a countdown to Christmas sign. I was pretty excited. Sometimes I need someone to tell me exactly what they want in order to get my butt in gear creative juices flowing. This was the perfect project to do the trick!


I made some simple pallet signs using the same method you can find here. I painted the signs red. Using my printer, I print the words in simple fonts. I turn the printed words over and rub chalk over them. I place the words where I want them and use a ball point pen to trace over the words. The chalk leaves a faint outline for me to paint the words. I also used chalkboard spray paint on a scrap piece of wood and glued it to the sign. 

I'm pretty happy with how it turned out. It would look great hanging on the wall or propped up on a mantel. And since this countdown doesn't have to start on December 1st, my friend can begin using it right away!

Monday, June 12, 2017

Red, White, and Blue

June/July is one of my favorite times to decorate! I love the colors red, white, and blue. In fact, when I was in my teens-early 20's, they were my bedroom color pallet. (Along with cow print!) There is something just so gosh darn fun about Americana

Since the 4th of July is so early in the month, I don't have any problem getting the decorations out halfway through June. I leave them up all the way through July, too. Here in Utah, the 24th of July is Pioneer Day, the day we celebrate the persevering pioneers who arrived in the Salt Lake Valley in 1847. Several years ago, I made this ox and wagon to add to my patriotic display:

 
I was so excited to get it out again! But, life threw me a curve-ball. I can't find my big box of July decorations. I don't understand how it could be lost. All decorations are in a box marked with the specific holiday and should be on a shelf in the storage room. I don't get it. It's just...gone. The box must be under the stairs, but if that's the case, ain't NO way I'm diggin' it out! Could be an unruly clan of burly spiders living under there! I can totally see it now: the blue-faced leader will come charging at me, seeming to shout, "You will never take our land!" There could be bloodshed!

WHOA. I got waaay off subject there. Sorry. 

Anyhoo, until Hubby has time to find my box, these pictures of my new stuff will have to suffice:

Uncle Sam's Hat


USA Red

USA White

Friday, June 2, 2017

This One Is For The Teachers...

School is out! Yay! I made it through another year of getting my 4 kids to 3 different schools! I get to sleep in! 

Wait...wait a sec...I also have to feed my kids 3 times a day. Actually 6-8 times a day. (You other moms know what I'm talking about.) Oh. And I have to listen to, "Mom, she took my..." and, "Mom, can I..." and, "Mom, when are you coming out of the bathroom?" Those things won't be abnormal, but they will increase. Exponentially. 

Seriously though. I love my kids more than anything! I also love the teachers that pushed, prodded, cajoled, and loved my girls into learning this year. Both my girls had awesome teachers. My teenage boys I'm sure did too. They just don't tell me anything. I have taken the approach that if they are passing their classes, all is well. 

I had the opportunity to volunteer 2-3 hours per week in my third grader's class. This is not normal for me. I'm the kind of parent that will do things at home for the teachers. Like grading papers and cutting things out. But, somehow, Mrs. P got me to help out faithfully every week of the school year. Mrs. P is amazing. Those kids listen to her, stay on task, stay organized, know what to expect each day, and know what is expected of them. They also had a lot of fun experiences. I got to work with each of the students, passing things off, playing with clothespin dolls, building a town, practicing lines for class programs, etc. It was an adventure every week! I learned to love these kids and got to know their personalities. I also noticed something else. Everyone was friends with everyone. Ev-er-y-one. These kids played together as a class at recess. They supported each other's accomplishments. I never heard them bad-mouthing each other. It was awesome and beautiful! Only once in a blue moon does this kind of camaraderie collide into one class. I am so very sad that next year won't be the same. 

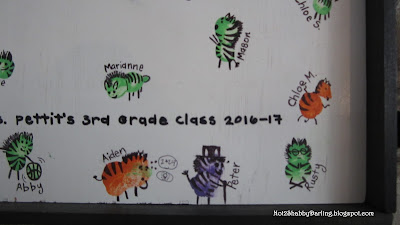
So, what kind of gift can you give a teacher like Mrs. P to thank her for all she has done? I wanted it to be something personal. Something to remind her of this amazing group of kids. I came up with this:


The Shel Silverstein poem is a class favorite. They performed their end-of-year program with zebras as the theme. 


I gathered the kids and they picked from orange, green, or purple paint to add their thumbprints to a white board. The colors are Mrs. P's favorites.


I added the poem and then turned the thumbprints into zebras. This took some thinking! Each print had to speak to me and tell me what to make it. Luckily, my daughter Faith is an artist. She took over and came up with some super cute zebras!


You may have noticed the mouse in the top right corner. That is Sammy the Rat. He is a character in the book, Witches by Roald Dahl, that the class read together at the first of the year. Sammy wanted to go to school to learn, so the class voted to let him stay. He had his own desk and everything!


Thank you Mrs. P for doing what you do best and giving me the opportunity to catch a glimpse!


Mrs. P loved the gift and so did the kids!

I also made some teacher thank yous for my booth:


And just because I couldn't resist:


Yup.
Thank you to all the teachers out there!

Thursday, May 11, 2017

Mother's Sweet Peas...

Today's post is sweet. Sweet with peas! I have had this idea running through my head for a while now. With Mother's Day fast approaching, I knew it was time to give it a try.

I made more signs like I showed you last time, here. I used my wonderful chalk pens and bought a few paint pens as well. I have used paint pens before, with horrible results. I don't know if it was me or the pens themselves, but I got paint everywhere! Thus, I have not wanted to invest my money into buying more. However, I really like the control I have when writing with pens, and I wanted some in green. Chalk pens mostly come in the popular neon colors, but the paint pens I used come in a variety of greens. I got mine at Wal-Mart for about $2 per pen. 

I got to work on the first sign, which made me nervous, because I don't like to freehand art. I shook my pen, held my breath, and went to work. Before I passed out, I stopped to see what I had done. To my utter surprise, it wasn't bad! 


So, I kept going. The lettering was tricky. I looked at the font I wanted and tried to replicate it. 


Why do I put myself through this stress? 


I asked my kids what they thought of my sign. Almost all of their responses were a giggle and, "Aww, how cute!" My oldest's response was...a small smile. Triumph!


What have I learned from this project? Well, first and foremost, is to try doing things that scare you. You will surprise yourself! Next, if you have failed at something before, don't give up. I looked those paint pens straight in the eyes and won! Third, getting my oldest son to smile for me melts my heart into ooey-gooey fondue!💗

Friday, May 5, 2017

A Small Tutorial...

Mother's Day is coming! I need my booth to be prepared! What is something fast and easy for me to make several of? 

Small pallet signs! 


Problem: I don't have any pallet wood right now. Solution: 5 1/2" x 6' cedar fence board. This stuff is rough, so plan on sanding it down and creating lots of sawdust. You can absolutely save time if you use other wood, but in this case it was faster to sand than go shopping. 

I cut the boards to 10 3/4" lengths. Why, you ask? Because I wanted the signs to be square, and 2 boards next to each other measures 10 3/4". (There's that sneaky math creeping up on me again!)


I then cut some wood lath 8" long. I glued and screwed 2 on the backs of the cedar board to hold them together.


Two cedar boards and 2 wood lath gave me enough pieces for 6 pallet signs. I had 2 - 5" lengths of the cedar board left over, so I made them into smaller signs. Waste not, want not!

Here's my stack, all ready to go!


All I had to do now was decide how I wanted them to look. I stained all of them in either Minwax Jacobean, Ebony, or Gray, and added some clear coat spray. Then I found some cute quotes about mothers on Pinterest. I got out my new favorite tool, a white chalk marker (yes, I have a new favorite tool for just about every project I do), and free-handed the quotes. I finished with a last spray of clear coat.

Viola! 


And the smaller signs:


Now my booth will be full and ready for Mother's Day!

Saturday, February 4, 2017

Shading...

I don't have a tutorial for this creation...yet. This was my first attempt at shading with wood stain, and I really didn't know how it would turn out. Or how I would finish it. Or if I would do it again.

I've been drooling over some gorgeous flower table tops done with stain. They are so beautiful! I don't pretend to be an artist, but I'm willing to try something at least once. I knew I needed to test my ability on something smaller than a table, however.

My super sweet aunt asked me to come up with something for her dinning room. She told me it needed to be the size of an open calendar and have the colors of rust and tan. Okay...That leaves the field of ideas WIDE open! 

Enter: wood stain flower art! I cut some wood scraps to about 17" long. I laid 3 side by side, which came out to close to 11". That's about the size of a calendar, right? I lightly painted the wood with rust colored paint. I knew I wanted some of the natural wood to show. 

Next, I stared looked at a picture of a dahlia. It looked simple, but I didn't want to mess it up! I free-handed the petals and got out my stain. I used a very small sponge brush to apply the stain. Next time, I will use a detail bristle brush for better control to paint the stain. That, and a different type of wood.

This process is time consuming, but hey, I happen to love the smell of wood stain. Like, if it tasted as good as it smells, I would probably try to drink it. I know. I'm strange, weird, crazy, etc. Yes, I know it's not good for you to inhale. No, I don't "huff" the stuff. I just really enjoy using stain. 

(Side-note: if someone really smart could pretty please develop air freshener or perfume that is non-toxic and smells like wood stain, I would be so very grateful!)

Anyhoo, once the stain was good and dry, I painted the petal outlines with a sand color paint. I also added more rust color to the base of the petals to give them depth. 


I cut some 1 x 2"s to frame up the finished art and stained them. After the framing was done, it still didn't look right, so I lightly sanded the edges for that ever popular "worn" look. 

It still didn't look done, so I looked through my treasure box and found some corner protectors. That's what was missing. Perfect! 


Sooo... it looks more like a chrysanthemum than a dahlia, but that's okay. It looks like a flower, which was the point. FYI, I know it looks like a flower because I asked my kiddos what it was and they responded, "a flower." Score!


I kinda' like it. More importantly, my aunt liked it! I will definitely be making more of these types of wood art. The possibilities are endless!  

Wednesday, February 1, 2017

A Quandry...

So, I have a bit of a problem. I have been making certain wood creations for a while now, and I think I have been calling them the wrong name. Not unlike when you want the attention of one child and end up saying the names of all their siblings first. "Hey, Brayden, Chase, Faith, I mean Lilly!"

Side story: my father-in-law had 3 boys and struggled with calling them by their names. Just to cover his bases, he would call out, "Ryan, Scott, Kelly, Mary, Ellen, Jane!"

Well, I have been using the wrong name to describe a type of art. The object looks like this:


This is what I have been calling "3D" art. Many times. For several years. Written down. On price tags.

"3D" Tree

It recently occurred to me that it might not be correct!

I really want to name my babies wood creations the right name. If you spend a lot of time creating something, it deserves the right name. I didn't spend 9 (8, really) months creating my first born child only to look at him and say, "I shall call him Dexter." Nope. He was definitely a "Brayden!"

So, I Googled it, and ya' know what? It's hard to google the word for something when you don't know what word to google! What is the correct name? I don't know. I searched and asked Hubby what he thought. Here are some of their ideas:

A relief is a sculptural technique where the sculpted elements remain attached to a solid background of the same material. (source)

"Relief" Home Sweet Home?


shadow is a dark area where light from a light source is blocked by an opaque object. (source)

"Shadow" Home Sweet Home?

Intaglio, in sculpture, engraving or incised figure in stone or other hard material such that all lines appear below the surface; it is thus the opposite of relief sculpture and is sometimes called “hollow relief.” (source)

"Intaglio" Love at Home?
None of these sound like the right fit. How 'bout the definition for "3D" art?
Three-dimensional definition, having, or seeming to have, the dimension of depth as well as width and height. (source) 

Huh. Maybe "3D" does work. What do you think?

"3D" Love at Home

Monday, January 9, 2017

May the Horse Be With You...


This is my most popular pin on Pinterest. Now that my blog is up and running, I thought I'd better try and get some credit for it!

I have a 10 year old daughter who is absolutely in love with horses. She has been a cowgirl at heart since she was tiny! When she was 2 or 3, she had some cowgirl boots that she was obsessed with. I remember her walking up and down the sidewalk in a shirt, diaper and those boots! At age 4, she watched Toy Story 2 (when we meet Bullseye) at least twice a day. My girl has stuffed horses covering her bed. She wears t-shirts with horses and jewelry depicting horses. You get the idea, right?

Well, this creation came about for my girl's 10th birthday. I was at Cracker Barrel one day and they had a sign to buy that said, "May the Horse Be With You." I had some great pallet wood that I was trying to think of a purpose for. I had a light bulb moment!

I cut a horse and horseshoe silhouette out of MDF, painted everything up, and presto! I was so excited to give this gift! My girl loved it! Other people loved it, too. I had several orders for signs in different colors, and I sold several from my Quilted Bear booth.


My girl has a birthday coming up again soon. 
Wonder what I can make her...