Showing posts with label wall hanging. Show all posts

Wednesday, January 17, 2018

Playing Catch-Up...

Wow. Am I glad that December is over! The stress of the holidays, kids out of school, and everyone getting sick (twice in some cases) is behind me.

I get the Winter Blues real bad. It starts around Thanksgiving and I don't escape the "fog" until around February. This year, however, the fog is already lifting! Probably because we have had such a mild winter. Hardly any snow to think of, although we are expecting a snow storm this weekend. The sun has been shining this week and the sky has been blue. I love me some blue sky! 

Since I'm feeling more normal (whatever that is), I actually finished some projects. And I realized there are a few things I've done that I didn't share on the blog. 

This last week I completed some signs for our Young Women's New Beginnings. If you are wondering what the heck that is, I'll tell you. New Beginnings is a time to welcome all of the girls turning 12 this year into the Young Women program. There are three classes of girls. Girls just entering and through to their 14th birthday are called Beehives. Girls ages 14 and 15 are Mia Maids, and girls 16 to 18 are the Laurels. I made each class a sign of their motto. The plan is to hang them up at the church.


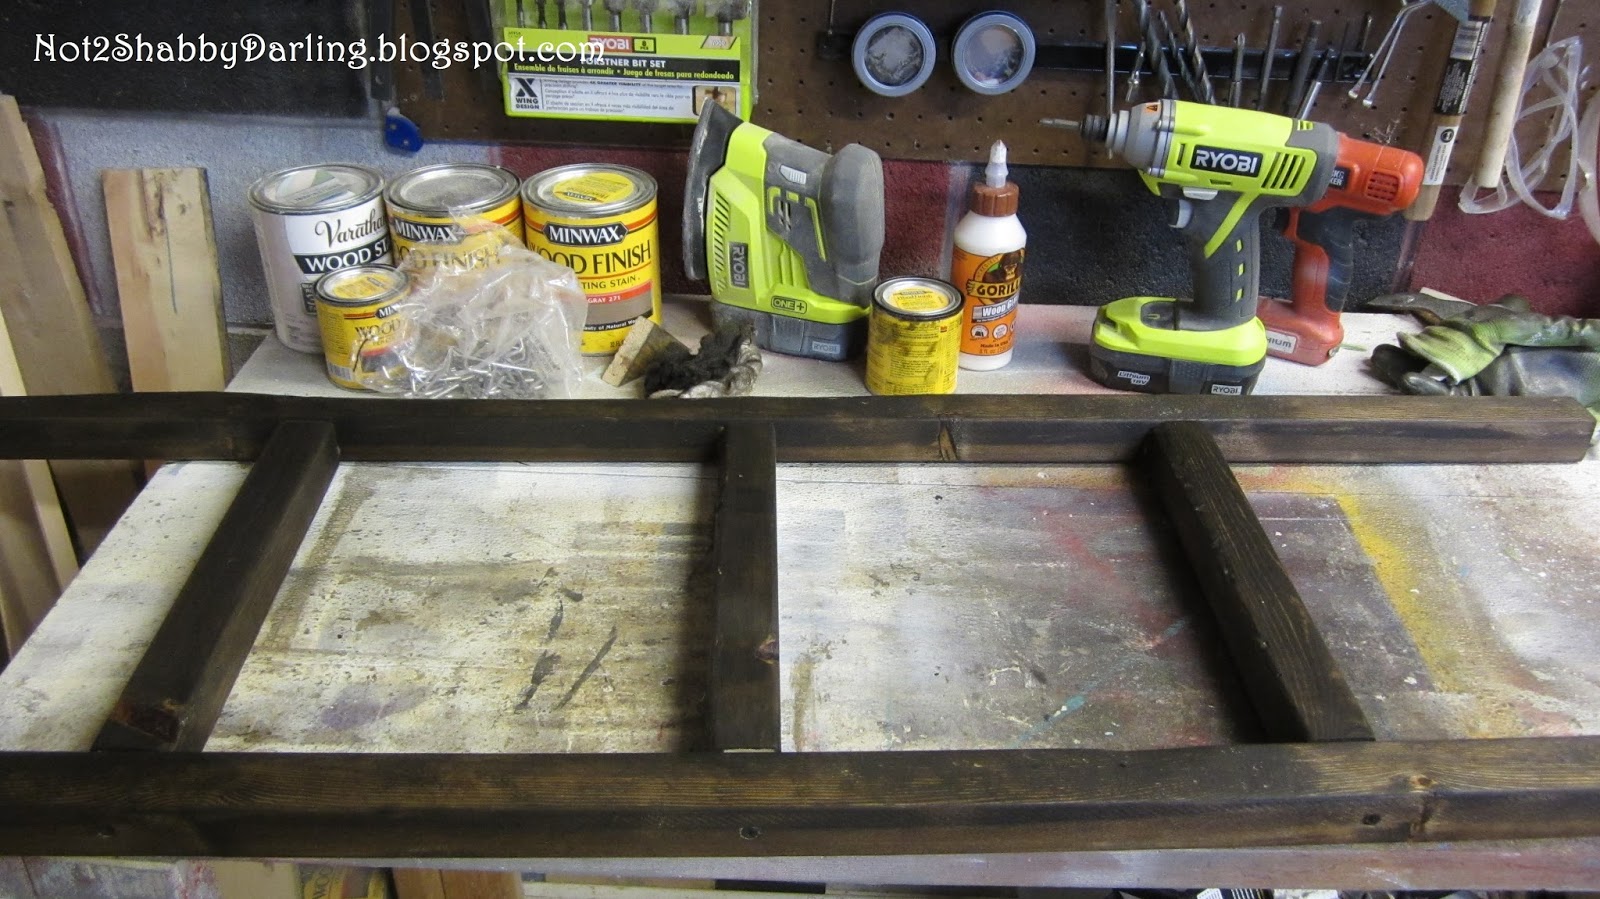
I don't have photos of how I made the signs, but I was given some 3/4" plywood already cut to 12" x 16". I then stained the plywood. I found some clip-art, typed up the mottos, and printed them out. I used a projector to enlarge the prints and traced out the words with a white paint pen. I traced the clip-art with a white colored pencil and then painted them.

I used some 1" x 2" pine to make the frames. I sanded them and added some wood stain to the edges. Next, I used some wax in places I wanted the stain to show through and then painted them white. When the paint was dry, or mostly dry, I used a razor blade to scrape of the wax areas. This exposes the dark brown underneath and gives it a roughed-up or aged look. Everything was sealed with a clear coat. I am really pleased with how the signs turned out! Now I have to figure out where in the classroom to hang them...

I also made some simple Christmas gifts. My daughter's teacher is a major Harry Potter fan, so I made him a grouping of four small signs.


I sanded some cedar fence board, cut into 5" squares. I spray painted the squares black and used my projector to trace the words with a white paint pen. I added a bit of color with some acrylic paint. I also roughed-up the edges with my sander and finished with clear coat.

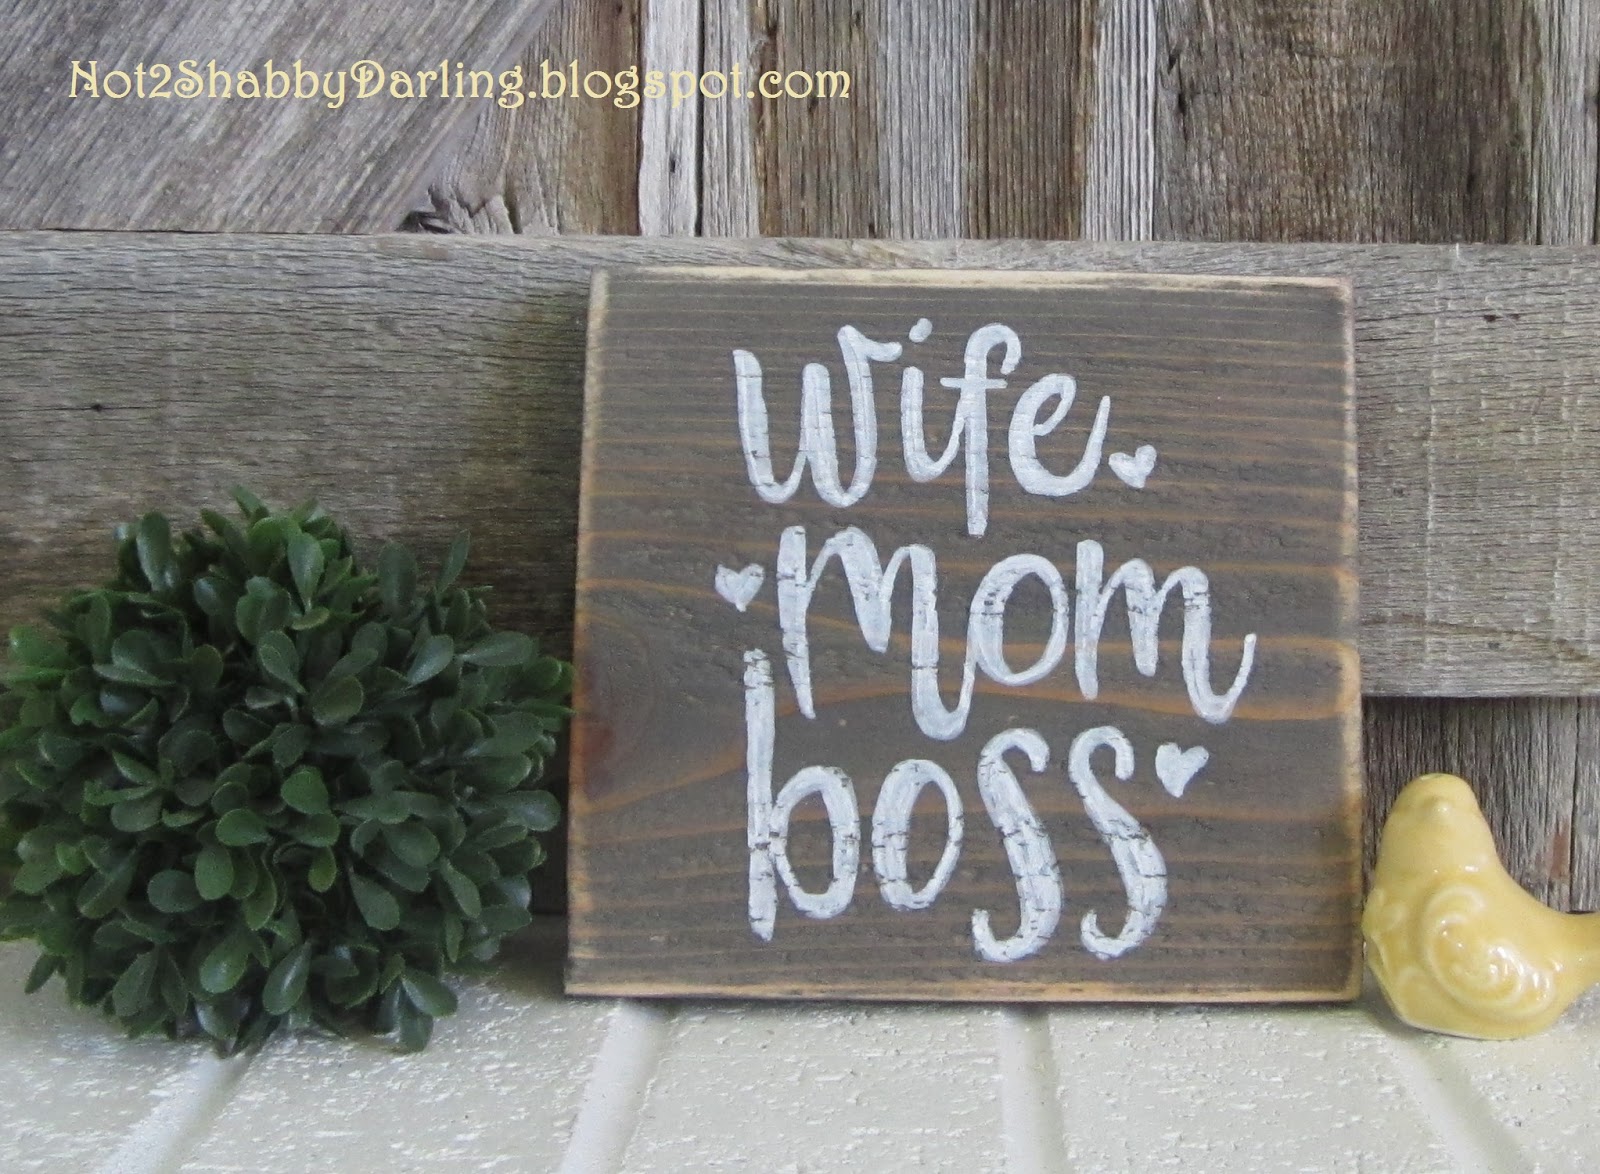
I made some small signs the same way, only using stain instead of paint. I free-handed these with a paint pen.


I also realized I haven't posted some of my other painting, or shading, with stain pictures. I love making these! FYI, I don't know the names of all these flowers, so I gave them names. Artist's prerogative.

Flower Blossom

Daisy Magnified


Hibiscus

Irish Daisy
The Irish Daisy above was fun. I used a knot in the wood to make the center of the daisy. That piece of wood was meant to be a daisy!

Belfast Blossom
I have used Minwax Jacobean for all of my art, but I wanted to try something different. I used Minwax Special Walnut and I had horrible results. The stain spread too quickly, so the flower looked fuzzy. You know, like when you aren't wearing your glasses kind of fuzzy. I was so disappointed because I really wanted to use a different color.

Open Rose
The rose above is a different color because it is a different type of wood. It was a piece of scrap I was given, so I'm not sure what kind of wood. It is also smaller and sold quickly, which means I need to make more of this size!

Tuesday, September 5, 2017

Daisy Do...

This will be a short post. I have so many thoughts running wild through my spaghetti brain that I can't seem to decide on what to write about. That goes along with my low production this summer. Usually I am out working in the garage everyday. The last few months have been too hot and I can't seem to gather the energy necessary to be creative.

That being said, I have found a new type of creation that I thoroughly enjoy making!


Painting with stain on a wood canvas. It is so fun to see an idea come to fruition! Do things always work out how I see them in my mind? Definitely not. But I am just a beginner when it comes to painting with stain. There are a lot of techniques I want to try. 

This daisy and the carnation I posted last time, were drawn freehand. I found pictures I liked and then drew them out on a wood "pallet." 


I used a fine tip brush to outline the flower. In places I wanted darker, I added more stain. This can be time consuming, but it allows me to work on other things in between drying.


To shade the daisy petals, I used a cloth and very lightly dabbed the open lid of the can of stain. I then rubbed the cloth over the petal until it had the look I wanted.


I love it! Wouldn't this piece of art look fabulous on a gallery wall? (Not an art gallery, a home gallery. You know, the type with family pictures and the like?) Actually, it would look good anywhere! Maybe that's why I haven't taken my creations to my booth to sell yet...

Monday, May 22, 2017

Tick Tock...

I was asked to make a clock project for our Relief Society's Super Saturday. For those of you who don't know, Super Saturday is a time to get together with the other ladies in the neighborhood and craft, visit, eat, and craft some more. These gatherings are a lot of fun and gives us a chance to learn from one another and get to know each other better. There were several crafts going on, such as glass etching, crocheting, paper qwilling, and wood craft. Mine, of course, was the wood craft. 

I was asked to do some wood clocks like this one I did several years ago:


I no longer have the clock. I gave it to a friend, who was once my neighbor. Whose mother is still my neighbor. Who is also my friend, who happens to be in the Relief Society presidency. Which, I'm guessing, is one reason I was asked to do this project. 😉

I made this clock with reclaimed fence wood and a vinyl wall clock from Die Cuts With A View. I got the clock about 4 years ago from a local Real Deals store, which has since closed. The clock cost me a whopping $3! A total steal, seeing as the original price was $39.99! 

I was slightly worried about getting clock parts for this project. I didn't know if I could find the same clock parts. I looked at various ways of doing it, but really, the easiest is vinyl. I was browsing a new website I found, Hollar.com, and guess what they had? 

Source
Yep. Jackpot! These babies were $5 each when I bought them. (Now, of course, they are $4 each.)

I ended up making 12 of the clock bases for our Super Saturday. Now, I don't like to procrastinate things, but I am ashamed to admit I did not make these clocks until the day before the big shin-dig. My excuses are many. I had to make Mother's Day gifts for my booth. My son had surgery and required my attention. I had a dentist appointment. I had to sleep. You get the idea. It was like rushing through an essay the night before it's due, only way more enjoyable.

I used 1"x4"x8' furring strips for the wood. I cut the boards into 20 1/4" lengths and gave them a quick sanding. Each clock takes 6 boards.


I laid them next to each other and attached them together with wood lath, glue and screws.


Now, simply repeat 12 times.

All of the ladies had a fun time painting the clocks. I am really kicking myself for not getting pictures of each of them, but I requested pics of the finished clocks hanging in their houses. If I get permission, I will post them here.

Each clock only cost $11. Not a bad investment, if I do say so myself!

Friday, May 5, 2017

A Small Tutorial...

Mother's Day is coming! I need my booth to be prepared! What is something fast and easy for me to make several of? 

Small pallet signs! 


Problem: I don't have any pallet wood right now. Solution: 5 1/2" x 6' cedar fence board. This stuff is rough, so plan on sanding it down and creating lots of sawdust. You can absolutely save time if you use other wood, but in this case it was faster to sand than go shopping. 

I cut the boards to 10 3/4" lengths. Why, you ask? Because I wanted the signs to be square, and 2 boards next to each other measures 10 3/4". (There's that sneaky math creeping up on me again!)


I then cut some wood lath 8" long. I glued and screwed 2 on the backs of the cedar board to hold them together.


Two cedar boards and 2 wood lath gave me enough pieces for 6 pallet signs. I had 2 - 5" lengths of the cedar board left over, so I made them into smaller signs. Waste not, want not!

Here's my stack, all ready to go!


All I had to do now was decide how I wanted them to look. I stained all of them in either Minwax Jacobean, Ebony, or Gray, and added some clear coat spray. Then I found some cute quotes about mothers on Pinterest. I got out my new favorite tool, a white chalk marker (yes, I have a new favorite tool for just about every project I do), and free-handed the quotes. I finished with a last spray of clear coat.

Viola! 


And the smaller signs:


Now my booth will be full and ready for Mother's Day!

Wednesday, May 3, 2017

More Cabinet Doors...

I had a very productive Monday. The weather was nice, I had nothing on my calendar, and most of all, I had ideas!

I had several old cabinet doors just waiting to be given a new life. I got them from the same shopping trip I mentioned here. No tutorial this time. In fact, I forgot to get before pictures. (Sigh.) My only excuse is that I was too excited to get to work!

Here is one idea two ways:


They can be used for photos or message displays. 

This one has new life as a coat rack and cork/chalkboard. Wouldn't it be fun in the entryway or mudroom?


The last one decided it wanted to be an artistic picture "frame." Not a frame in the typical sense. It has clothespins to hang pictures from a strip of braided leather. The leather was left over from another project I did that used an old belt. I found it while rummaging through my collection of "stuff." It was the perfect length, so it was kismet, fate, meant to be!


Now, if you will excuse me, the garage is calling...

Monday, April 24, 2017

It's All About Family...

Look what I made out of a reclaimed wood cabinet door!


Can you believe it? It looks like I used a frame. This was soooo easy! I'll show you some steps, but I forgot to get pics of the entire project. (Smacks hand to forehead)

I have found a new love. It's the ReStore in Ogden. They have so many fun things to buy. You never know what you will find and your mind works overtime thinking of what to create. It's like a thrift shop for DIYers! All proceeds go to Habitat for Humanity. Check out the link to learn more. 

I found several reclaimed cabinet doors. The prices run between $2 and $7, but I have gotten several for $1. A dollar guys!

Anyhoo, I taped off the door to paint the "frame" white. I wanted this project to have a "chippy paint" look, so before I painted, I rubbed a little wax along the edges of the frame. When the paint is dry, you can wipe or scrape off the wax and get an awesome time-worn look. 


I cut down some scrap wood I had and painted it in several different colors. Then I sanded them a little to make them look worn.


After everything was dry, I used wood glue to attach the scraps of wood to the center of the door. I weighed down the scraps with whatever heavy thing I had nearby. 

I had the word "family" left over from one of my sister's projects. I painted it white to match the frame and then sanded it to rough it up. I think it helps to stand out from the background. I used wood glue for this as well.

I love it! So fun and it makes me happy!


Monday, April 17, 2017

In Love With a Ladder...

I fell in love with a ladder. A ladder that isn't used as a ladder. This is the ladder in question:

Old Wood Ladder & Chicken Wire Frame:
Source
I followed the pin to credit the original source, but none was found. That makes me sad. Someone should get credit for their beautiful inspiration. Getting credit is something near and dear to my heart, as you may know. If you want to know the whole story, click here.

Anyhoo, I simply had to make one of these ladders! I love the idea! Just one teensy-weensy problem. I don't have an awesome old ladder hanging around. Guess I'll have to build one!

First I decided what size ladder I wanted. I had some 2" x 2" x 8's. To make it easy, I cut one in half. (To prove that I really do use math later in life, that means 2 pieces of wood 24" long.) Then I cut 3 pieces of the 2" x 2" to 12". I wanted to be able to display an 8 x 10 frame between the rungs.


Next I made marks where I wanted the rungs to be, evenly spaced. I forgot to write down the exact measurements, sorry.  I used a counter sink drill bit to drill holes for the 2 1/2" screws. Using a counter sink bit will make sure the screw head doesn't stick out from the wood. We don't want a Frankenstein ladder, do we?


Time to assemble the ladder. I used wood glue to hold everything in place and let it dry. I feel it's easier to screw together if the ladder is already one piece. 


I used my Ryobi driver to attach the screws.


Time for some stain! Once again, I used Minwax Jacobean stain. 


When the stain was all dry, I sanded down the edges to give the ladder an "aged" or "worn" look. I then added some semi-gloss clear coat to "wake-up" the wood. When that was done, I measured out some chicken wire. This stuff is fun to work with, but can be sharp. Wear gloves and use wire cutters to get the amount you want. 


The chicken wire was too shiny for my taste, so I whipped out some black spray paint. I just happened to grab my can of High Heat paint, not because I plan on heating the wire, it was just the first can of black I saw. I wasn't meticulous in making sure the black paint covered everything. I just wanted to tone down the "newness" of the wire. 


For the next part, I grabbed my staple gun. I then added staples to the back of the ladder to hold the chicken wire in place. 


I also added some D-ring hardware (no picture, sorry) to hang the ladder on the wall. I added the hardware so that the ladder can hang horizontal or vertical. Or the ladder can just lean against a wall. 

I thought the ladder was missing something, so I added some fun decorative metal pieces. 


I also stuck some clothes pins on the wire to hang pictures, notes, memos, reminders, etc. 


I am very happy with how it turned out! What do you think?